|

Title:
HOW TO:
Add a Logo Image to Your Report Headings
Overview:
There may be times when you want an image of your company logo to appear on
your reports. This document explains how to add an image to your report header.
Background:
Reports in FLEETMATE are grouped together into report sets.
A set correlates to a report type as selected in the Report Viewer. Each set is
stored in a file with an "xml"
file extension. By default, these files are stored in the "..\Reports"
subfolder, beneath your FLEETMATE installation folder (e.g. "C:\Users\Public\FLEETMATE").
The changes described here should only be made to Custom
report sets, never to Base report sets. A
Base report set filename begins with the characters "fm_".
Custom report sets created/edited with Report Designer must have filenames that
begin with the characters "rd_". Again, only custom report sets should be modified using Report Designer. If
you make changes to a Base report set, you'll lose your changes whenever you
perform an update to the latest release of FLEETMATE.
Each report set contains a subreport named "_CompanyHeader".
This "_CompanyHeader" subreport appears in the Header section of each
FLEETMATE report. Since this subreport is shared by all reports (except the
Invoice) within a report
set, it is suggested that you place your logo graphic in the
"_CompanyHeader" subreport.
In this document, we will use "rd_maint.xml"
(maintenance related reports) as the example custom report set.
Procedure:
You will need a JPG or GIF image file that contains your company logo. For
good image resolution when printing your reports, use a large image, and set the
.PictureAlign property to "Stretch." You can then
resize/reposition your image accordingly using your mouse. A
logical place to store this image file is in the FLEETMATE "Reports"
subfolder within your Windows file system.
Start FLEETMATE Report Designer. Open the "rd_maint.xml" report set.
Click on the "_CompanyHeader"
subreport.
You will need to rearrange the existing fields to make room for your logo image.
Once you've done this, click the Unbound Image
toolbar button, and draw your image object in the Header
section using your mouse.
With the Unbound Image object selected, change the Name
property to "Logo". In the sample
picture below, we've changed the BackColor property to gray to highlight the
Logo Unbound Image object to make it easy to see, and we've added the text
"Name: Logo" in red. You will not see this text. In your case the
BackColor property will be set to Transparent. You can change the BackColor
property if you wish.
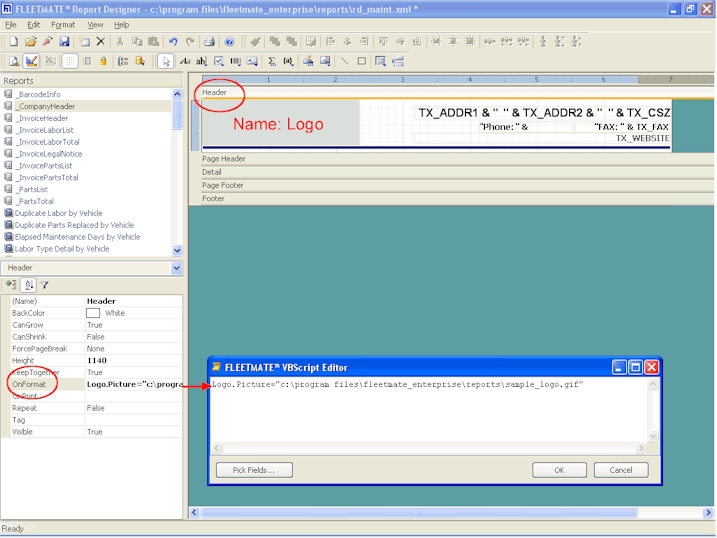
Click
on the Header
section. In the properties list on the left, click
on the OnFormat
event, and then click the ellipsis (...)
button. This will open the VBScript Editor window. In
this script window, you will be adding a statement
to set the path of your image file, and assign
this path to the Picture
property of the Logo
object. The path to your image file must be enclosed
in double quotes.
As an example, if your image file is located at
"C:\MyFiles\MyLogo.jpg"
your VBScript statement will be:
Logo.Picture
= "C:\MyFiles\MyLogo.jpg"
Click OK to save
the VBScript statement.
When
you preview your work, the _CompanyHeader subreport
will render on your screen, similar to the sample
picture below.

Once you have completed your work,
be sure to save your report set (XML) file.
Note: Since each report set contains its own "_CompanyHeader"
subreport, you will need to edit this subreport in each custom report set where
you want your logo image to appear.
|